
Note: This article originally appeared January 28, 2014 on the IndySoft Corporation Blog
The IndySoft product line has one of the most in-depth security and profile management systems available for an asset management system. Out of the box there are over 2750 security checkpoints that can be defined per profile and that number rises as you grow the product through your custom configuration efforts. Security checkpoints can range from allowing or preventing access to various utilities in the software all the way down to defining required fields to be completed within the asset event model.
As you might imagine with such a robust security system reviews of security roles can be a daunting task. Sometimes reviewing each profile one at a time just doesn’t cut it. What you need is a way to compare all of your security settings side by side, across all profiles. That brings us to our latest post… the security profile comparison report.
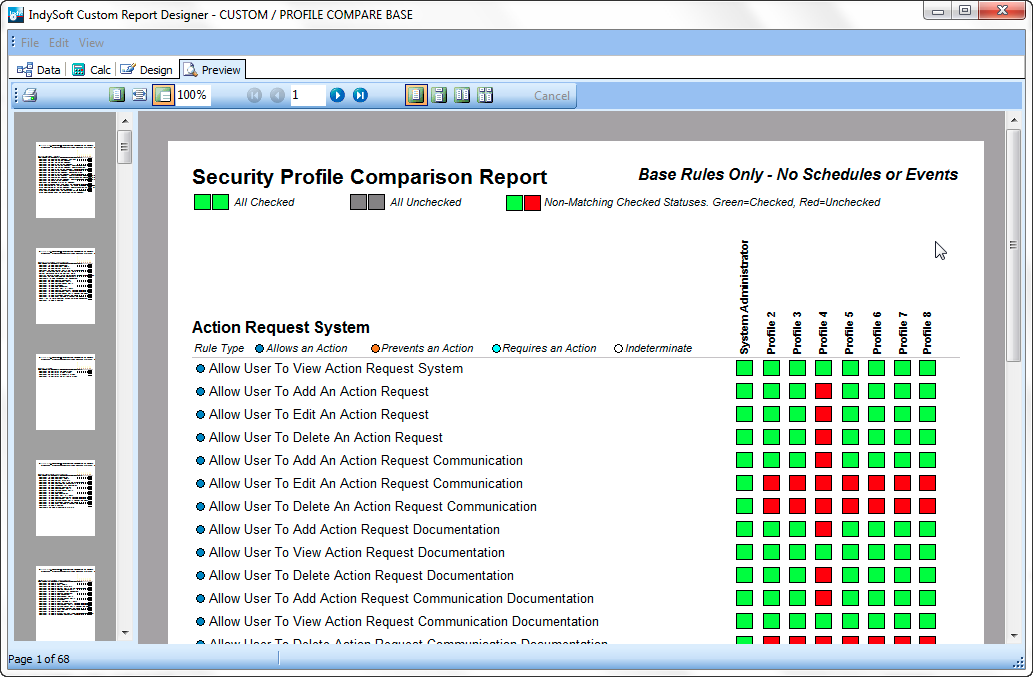
Example Preview of the Security Profile Comparison Report
What the Security Profile Comparison Reports allow you to do is view every setting for every profile side by side within each security group allowing for instantaneous visual confirmation of all/none or mixed deny/allow settings in your security rules. This isn’t a very advanced report but it has a lot of components so we’re providing you with a download link to the report and only an explanation of the report construction.
Keep in mind the provided example report has only been written for and tested on a SQL Server platform. Firebird and Oracle users may need to retool the SQL aliases and joins to meet their target platforms.
Because there are so many settings we have opted to split the report up into three logical reports. The base report will give us all security settings short of events and schedules, while the latter two are dedicated to schedule and event related actions. This post will focus on contents the base report. The difference between the construction of the three reports is nothing more than filtering the SQL results.
Navigating to the Data tab you’ll find the data pipeline we have constructed. This is a custom SQL query which cannot be generated with the built-in query tools provided in PrintBuilder. The code is below:
SELECT A2.DESCRIPTION AS 'GROUP', A3.SECURITY_DESCRIPTION AS 'DESCRIPTION', A.PROFILE AS 'PROFILE1', A3.SECURITY_VALUE AS 'VALUE1', B.PROFILE AS 'PROFILE2', B3.SECURITY_VALUE AS 'VALUE2', C.PROFILE AS 'PROFILE3', C3.SECURITY_VALUE AS 'VALUE3', D.PROFILE AS 'PROFILE4', D3.SECURITY_VALUE AS 'VALUE4', E.PROFILE AS 'PROFILE5', E3.SECURITY_VALUE AS 'VALUE5', F.PROFILE AS 'PROFILE6', F3.SECURITY_VALUE AS 'VALUE6', G.PROFILE AS 'PROFILE7', G3.SECURITY_VALUE AS 'VALUE7', H.PROFILE AS 'PROFILE8', H3.SECURITY_VALUE AS 'VALUE8' FROM PROFILE A LEFT OUTER JOIN SECCAT A2 ON A2.PROFILE = A.PROFILE LEFT OUTER JOIN SECITEM A3 ON A3.PROFILE = A2.PROFILE AND A3.SECURITY_CATEGORY=A2.SECURITY_CATEGORY, PROFILE B LEFT OUTER JOIN SECCAT B2 ON B2.PROFILE = B.PROFILE LEFT OUTER JOIN SECITEM B3 ON B3.PROFILE = B2.PROFILE AND B3.SECURITY_CATEGORY=B2.SECURITY_CATEGORY, PROFILE C LEFT OUTER JOIN SECCAT C2 ON C2.PROFILE = C.PROFILE LEFT OUTER JOIN SECITEM C3 ON C3.PROFILE = C2.PROFILE AND C3.SECURITY_CATEGORY=C2.SECURITY_CATEGORY, PROFILE D LEFT OUTER JOIN SECCAT D2 ON D2.PROFILE = D.PROFILE LEFT OUTER JOIN SECITEM D3 ON D3.PROFILE = D2.PROFILE AND D3.SECURITY_CATEGORY=D2.SECURITY_CATEGORY, PROFILE E LEFT OUTER JOIN SECCAT E2 ON E2.PROFILE = E.PROFILE LEFT OUTER JOIN SECITEM E3 ON E3.PROFILE = E2.PROFILE AND E3.SECURITY_CATEGORY=E2.SECURITY_CATEGORY, PROFILE F LEFT OUTER JOIN SECCAT F2 ON F2.PROFILE = F.PROFILE LEFT OUTER JOIN SECITEM F3 ON F3.PROFILE = F2.PROFILE AND F3.SECURITY_CATEGORY=F2.SECURITY_CATEGORY, PROFILE G LEFT OUTER JOIN SECCAT G2 ON G2.PROFILE = G.PROFILE LEFT OUTER JOIN SECITEM G3 ON G3.PROFILE = G2.PROFILE AND G3.SECURITY_CATEGORY=G2.SECURITY_CATEGORY, PROFILE H LEFT OUTER JOIN SECCAT H2 ON H2.PROFILE = H.PROFILE LEFT OUTER JOIN SECITEM H3 ON H3.PROFILE = H2.PROFILE AND H3.SECURITY_CATEGORY=H2.SECURITY_CATEGORY WHERE A.PROFILE = 'SYSTEM ADMINISTRATOR' AND B.PROFILE = 'Power User' AND C.PROFILE = 'Standard User' AND D.PROFILE = 'Reports Only' AND E.PROFILE = 'AddYourProfile' AND F.PROFILE = 'AddYourProfile' AND G.PROFILE = 'AddYourProfile' AND H.PROFILE = 'AddYourProfile' AND B2.SECURITY_CATEGORY = A2.SECURITY_CATEGORY AND B3.SECURITY_ITEM = A3.SECURITY_ITEM AND C2.SECURITY_CATEGORY = A2.SECURITY_CATEGORY AND C3.SECURITY_ITEM = A3.SECURITY_ITEM AND D2.SECURITY_CATEGORY = A2.SECURITY_CATEGORY AND D3.SECURITY_ITEM = A3.SECURITY_ITEM AND E2.SECURITY_CATEGORY = A2.SECURITY_CATEGORY AND E3.SECURITY_ITEM = A3.SECURITY_ITEM AND F2.SECURITY_CATEGORY = A2.SECURITY_CATEGORY AND F3.SECURITY_ITEM = A3.SECURITY_ITEM AND G2.SECURITY_CATEGORY = A2.SECURITY_CATEGORY AND G3.SECURITY_ITEM = A3.SECURITY_ITEM AND H2.SECURITY_CATEGORY = A2.SECURITY_CATEGORY AND H3.SECURITY_ITEM = A3.SECURITY_ITEM AND A2.DESCRIPTION NOT LIKE 'Event Settings%' AND A2.DESCRIPTION NOT LIKE 'Schedule Settings%' ORDER BY A2.SECURITY_CATEGORY, A3.SECURITY_ITEM; |
Each profile (this example report has placeholders 8) is setup as an alias and retrieves all the settings per profile in order of category and security item. Additional items in the WHERE clause rule out any settings related to events or schedules. The latter part of the WHERE clause is the only deviation between the three individual reports. Removing those last two WHERE clause items in the base report will create one master report for all security settings.
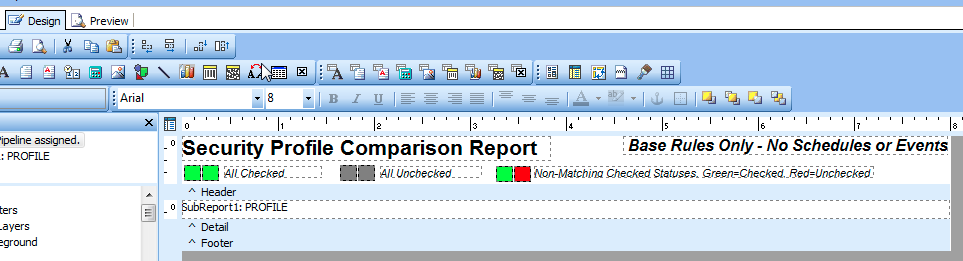
The Report Header with Legend
The main report window in the design view shows a legend for how to interpret the resulting data in the report. All green on a row means every profile has that option enabled. All grey means every profile has that option disabled. A mix of red and green reflects enabled/disabled options across the profiles.
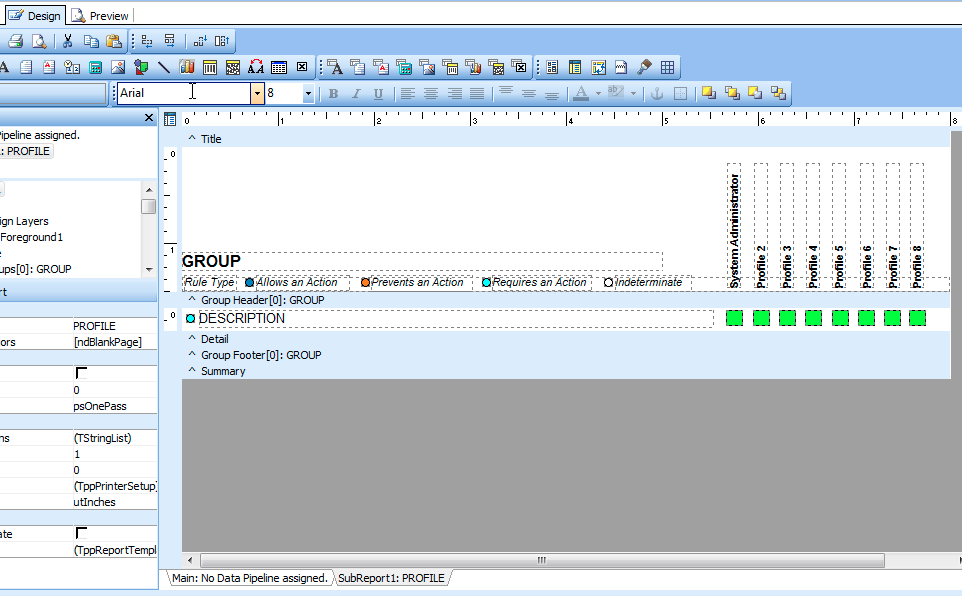
Subreport Layout with Header
The subreport for the PROFILE pipeline shows a series of rotated labels for each profile in the report along with a security item legend/indicator and a series of colored squares.
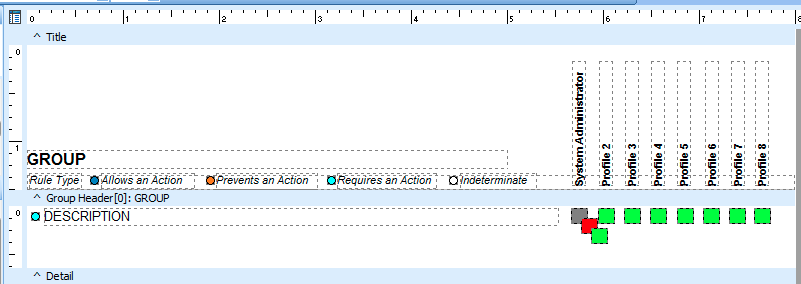
Stacked Squares Used to Visualize Settings
The colored squares are actually stacked on top of each other and shown/hidden based on the data provided. We could have gotten fancy with a simpler design setting the colors dynamically but this method works just as easily for this simple report. The code to show or hide the colored squares along with altering the icon to reflect the type of security item you are viewing is located in the detailbeforeprint event for the Profile detail band and is shown below:
procedure detailbeforeprint;
begin

p1checked.visible := false;
p1unchecked.visible := false;
p1unmatched.visible := false;
p2checked.visible := false;
p2unchecked.visible := false;
p2unmatched.visible := false;
p3checked.visible := false;
p3unchecked.visible := false;
p3unmatched.visible := false;
p4checked.visible := false;
p4unchecked.visible := false;
p4unmatched.visible := false;
p5checked.visible := false;
p5unchecked.visible := false;
p5unmatched.visible := false;
p6checked.visible := false;
p6unchecked.visible := false;
p6unmatched.visible := false;
p7checked.visible := false;
p7unchecked.visible := false;
p7unmatched.visible := false;
p8checked.visible := false;
p8unchecked.visible := false;
p8unmatched.visible := false;
icoAllow.visible := false;
icoBlock.visible := false;
icoUnknown.visible := false;
icoRequire.visible := false;

if (Copy(PROFILE['DESCRIPTION'],1,5) = 'Allow') then
begin
  icoAllow.visible := true;
end
else if (Copy(PROFILE['DESCRIPTION'],1,5) = 'Block') then
begin
  icoBlock.visible := true;
end
else if (Pos('Require',PROFILE['DESCRIPTION']) <> 0) then
begin
  icoRequire.visible := true;
end
else
begin
  icoUnknown.visible := true;
end;

if ((PROFILE['VALUE1'] = 1) AND
(PROFILE['VALUE2'] = 1) AND
(PROFILE['VALUE3'] = 1) AND
(PROFILE['VALUE4'] = 1) AND
(PROFILE['VALUE5'] = 1) AND
(PROFILE['VALUE6'] = 1) AND
(PROFILE['VALUE7'] = 1) AND
(PROFILE['VALUE8'] = 1)
) then
begin
  p1checked.visible := true;
  p2checked.visible := true;
  p3checked.visible := true;
  p4checked.visible := true;
  p5checked.visible := true;
  p6checked.visible := true;
  p7checked.visible := true;
  p8checked.visible := true;
end
else if ((PROFILE['VALUE1'] = 0) AND
(PROFILE['VALUE2'] = 0) AND
(PROFILE['VALUE3'] = 0) AND
(PROFILE['VALUE4'] = 0) AND
(PROFILE['VALUE5'] = 0) AND
(PROFILE['VALUE6'] = 0) AND
(PROFILE['VALUE7'] = 0) AND
(PROFILE['VALUE8'] = 0)
) then
begin
  p1unchecked.visible := true;
  p2unchecked.visible := true;
  p3unchecked.visible := true;
  p4unchecked.visible := true;
  p5unchecked.visible := true;
  p6unchecked.visible := true;
  p7unchecked.visible := true;
  p8unchecked.visible := true;
end
else
begin
if (PROFILE['VALUE1'] = 0) then p1unmatched.visible := true else p1checked.visible := true;
if (PROFILE['VALUE2'] = 0) then p2unmatched.visible := true else p2checked.visible := true;
if (PROFILE['VALUE3'] = 0) then p3unmatched.visible := true else p3checked.visible := true;
if (PROFILE['VALUE4'] = 0) then p4unmatched.visible := true else p4checked.visible := true;
if (PROFILE['VALUE5'] = 0) then p5unmatched.visible := true else p5checked.visible := true;
if (PROFILE['VALUE6'] = 0) then p6unmatched.visible := true else p6checked.visible := true;
if (PROFILE['VALUE7'] = 0) then p7unmatched.visible := true else p7checked.visible := true;
if (PROFILE['VALUE8'] = 0) then p8unmatched.visible := true else p8checked.visible := true;

end;
end; |
This report is setup with 8 default security profiles. You may have more or less. To modify the report to suit your needs you will need to:
- add your profile names in the SQL, adding or removing related aliases and joins depending on your profile count
- modify the rotated labels to reflect the profile names you use in order of your aliases in the SQL
- add or remove additional squares in the report results and modify the code accordingly
Clicking the preview tab results in a very easy to read and understand report which can be used in verification/validation efforts of your IndySoft profiles.
Downloads
The following link provides access to the IndySoft version 9.1.12 custom reports for SQL Server. Unzip and import into your Printbuilder custom reports group to modify as required.